|
Basecoat -
This is the initial layer of color applied to an area of
your project. Use as large a brush as possible and
apply with long smooth strokes so you don't leave any
ridges.
*
* *
* *
|
 |
Float Shade -
Float shading is probably the most difficult
technique to master in acrylic painting. If your brush is
too wet, color will spread across the width of your brush
and leave an unwanted edge. If your brush is too dry, the
floated color won't spread properly, leaving a very stark
strip of color. The only
advice I can give is practice and keep trying. You'll
find that within a short period of time you'll automatically
know how wet your brush needs to be to get the desired
shaded effect you are looking for. It will just "feel"
right.
How to Float Shade:
Make sure the basecoat is completely dry before you float
shade. Dip brush into water, then lightly blot on a
paper towel to get rid of the excess water. Dip the
corner of your brush into paint and stroke your brush back
and forth on your palette to blend the water and paint
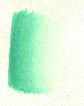
together. Then apply the shading to your
project. As you can see in the picture at left, color
is very intense on one side of the brush and floats
out to clear water on the other side of the brush.
Float darker shades of your basecoat to SHADE; float light
hues to HIGHLIGHT.
Float shading adds depth and
dimension to your finished painting and gives it a nice
rounded effect.
*
* *
* *
|
 |
Stipple or
Stippling - This technique is used for apply color
to cheeks of faces and to sometimes highlight areas of a
painting. Special stippling brushes can be purchased for
this, or you can use those old, worn out, flat brushes that
aren't flat anymore.
How to Stipple:
Dip a dry brush into paint, bounce it on paper towel to
remove excess paint, then bounce it up and down on your
project.
*
* *
* *
|
|

|
Drybrushing -
This works well to highlight areas of your painting. Dip a
flat brush in paint. Rub it back and forth on a paper towel
to remove most of the paint. Drag your brush in one
direction across the basecoated area. The idea is to end up
with just a hint of paint across your basecoat...like chalk
on a sidewalk.
* *
* *
*
|
 |
Stripes -
thin your paint with water to an ink-like
consistency. Use a liner brush (the size depends on what
size stripes you want). You'll achieve straighter lines and
have more control if you start at the top of the area to be
striped and pull the brush downward.
* *
* *
*
|
 |
Dots -
You can use a #1 round brush or the end of the
handle of a brush. They also make dotting tools just for
the purpose of making different sizes dots.
*
* *
* *
|
 |
C-Strokes
- Using a liner brush, start as if to make a dot, then
lift up on your brush as you continue to curve out the
remainder of the stroke. This is fun!
* *
* *
*
|
 |
Cat Stripes -
Using a liner brush and your paint thinned to an ink-like
consistency, "squiggle" in the stripe as if scribbling with
a pencil. Start at the widest part and squiggle down to a
point. *
* *
* *
|